
1: Practice Practice Practice

Practice is without a doubt the most important factor to improve your photography. This may seem like an obvious statement, however, preparing for an upcoming trip that will see you in specific environments that may require a specific skill set to capture images is important. The process of capturing internal images of churches in Italy is very different from photographing wildlife in the back of a vehicle in Africa. While travelling will undoubtedly give you more time to devote to image-making, being prepared for the types of photography opportunities you expect to encounter is imperative to capture the images you hope to.
If you are planning some multi-day hikes in Australia, head out for some day hikes beforehand to prepare yourself for a similar activity. Getting used to stopping and setting up to take photos means you will work efficiently and have a better success rate on your multi-day hike. You will instinctively know if you will need your tripod for a particular shot or if you are confident you can do it handheld. You will know if you need a wide or telephoto lens. You will get into a daily rhythm of being prepared for the days shooting as you have already been doing it in the lead up to your trip.
2: Preparation is Key

Being sure you are prepared for a particular activity that includes photography is critical in being able to maximise the opportunities that present themselves when travelling or on a hike. For example, if you have time and opportunity to download images each day, then be sure to do so. Not only does it give you time to review your images, but it may also help to identify issues with your gear or capture process that need to be addressed. If you have time to charge batteries and clean your gear, then be sure to do it. There is nothing worse than completing a pre-dawn climb of a mountain, reaching the summit only to realise you forgot to charge batteries and pack a clean memory card. These may seem obvious, but it is often the simple things you forget.
When travelling to an environment that may be challenging or with inconsistent weather, be sure to have everything you need to be able to keep on taking images, like a rain jacket and protection for both you and your camera.
3: 80/20 Rule

Devote 80% of your image making time to getting the images you set out to do. Play it safe to a certain degree to be sure you come home with your planned shots. Then for the remaining 20% of the time, throw caution to the wind and experiment with no expectation of any outcome. If you think about this approach, 20% of your image making time adds up to quite a bit. Pushing yourself with the 20% will not necessarily lead you to capture amazing new images every time, but it will allow you to have little discoveries along the way that can add up to thinking of new ways or approaches for the future.
Experimenting with shutter speed, white balance, aperture, ISO, focal length, and movement are all options that can result in new ways of doing and seeing things. Ultimately, this will help you to understand the best approach to a given scenario with controlled, positive results.
4: Experiment with your camera’s settings to develop an understanding of what they do.

This does not mean you need to understand what every dial, setting and option on your camera means. Rather, understanding your camera’s settings, options and controls means you can make informed decisions to achieve the results you are looking for. It also means you can work to avoid results you are not happy with.
Without doubt, the complexity of current cameras available on the market seems to grow with each model that is released, however, the fundamental process of photography and capturing images is relatively unchanged, even when compared to the process of capturing to film.
For this reason, it is important to look at these fundamentals and do your best to understand and how and why they work the way they do, even when not shooting with manual control over these settings, you can still make decisions to affect your results.
Important settings and features to understand:
ISO: The sensitivity of your camera to light. This is a flow from film days where different film ISO/ASA values would be used based on the brightness of the scene you were taking images in. A low ISO value of 100 would be used on a bright sunny day, 200-400 on an overcast day and 800 or higher during darker conditions. Not much has changed except that ISO levels in digital cameras can be changed on the fly and render images with much less grain/noise than traditional film.
Aperture: Depth of field or the amount of the image in focus. A small aperture no (f2.8 or lower) will generally render an image with a small amount in focus, great for portraits, and a larger aperture no (f8 or higher) will generally render an image with a larger amount in focus, great for landscapes.
Shutter Speed: Shutter speed is the amount of time the shutter is open and provides control over either freezing the action or purposely blurring any movement in the resulting image. Generally, for handheld images, you would aim to have a minimum of 1/60th of a second shutter speed with longer lenses requiring faster shutter speeds to avoid blur.
Colour Temperature: While the auto function for colour temperature on modern cameras works extremely well, it is important sometimes to understand how to set the best colour temperature setting for a given scene. Luckily there are easy options available to match your colour temperature to the scene you are photographing.
5: When the weather goes bad, go outside and keep taking photographs.
Travelling and trekking in remote areas can often take its toll, leaving us tired at the end of the day and less than motivated to rise in the morning, especially when facing average weather. However, no matter the weather, there are always potential opportunities for capturing beautiful and meaningful images.
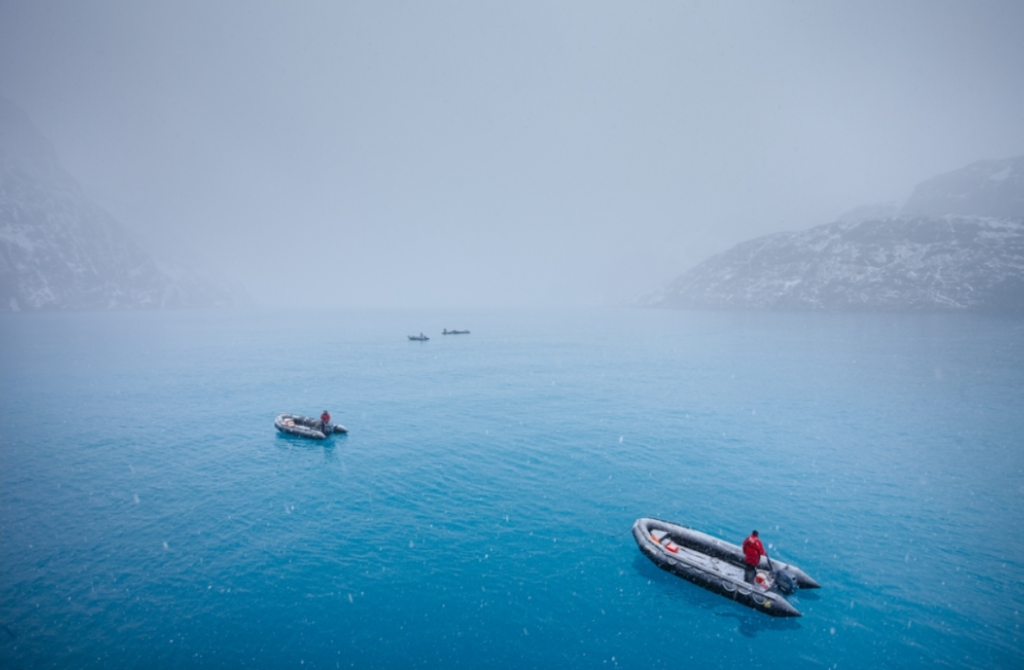
This has been the case for me on many occasions. When working in Antarctica and South Georgia, we had a lot of exploration time in the zodiacs (small inflatable boats). On one particular occasion, we were advised of a one-hour cruise which turned into 3.5 hours due to the many photo opportunities we had. It was a cold day and snowed the entire time. That added to the challenge of shooting, often with a long lens from a moving craft amongst 10 other people also working hard to get the shot in the confines of a small boat. Once we were all loaded safely back on board, almost all participants went inside immediately, either for a warm shower or a warm drink and rightly so as it was very cold.
A couple of other photographers and myself stayed outside on the deck of the ship to see if there were any other photo opportunities that presented themselves before we pulled anchor and continued on our way. The image above was enough to make the effort completely worthwhile. We pushed ourselves and were rewarded with many great images which no one else captured. We were only outside for a further 30 minutes, however, the images captured made the effort worthwhile.
When you travel, you are surrounded by so many photographic opportunities. Remember to take full advantage of these and everything that travel offers. Of course, the most important thing is to enjoy yourself, however, if images are a high priority, be sure to take advantage of the time you have and be out and about as much as possible.
Damian Caniglia is a trek leader and photographer. Check out his website, follow him on Instagram or swing him a like on Facebook.